ShopDreamUp AI ArtDreamUp

Deviation Actions
Early Access and Process
This Tier will get you early access to my work as well as my work in progress / art process.
$5/month


Suggested Deviants


Suggested Collections


You Might Like…


Featured in Groups

Description
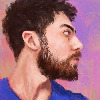
Step 01: I figure out the background tone (usually a grayish tone). I also use a similar color but darker to lay in my rough shapes, keeping it loose) Try to stay as still as you can at this point. Squint if it helps.
Step 02: On a new layer I add in my darkest darks (shirt, hair, eyebrows, maybe even darker shadow areas)
Step 03: I gray down my shadow color a little to make it more cool and being introducing some simple midtone colors
Step 04: On another layer, maybe below the initial lines, I add in the general flesh midtone and begin thinking about color variation throughout my skin; still pretty loose
Step 05: I continue adding subtle plane shifts and add in the cool desaturated color of the blue light on the side of my face
Step 06: I think this is where I redid MY LEFT eye. It wasn't looking right. Still not even sure if I'm satisfied with the eyes.
Step 07: I continue rendering, I zoom in to tighten a few things up, namely the eyes; I add the highlights and I use a soft brush to add the dark and light soft areas on either side of me. You could do more than I did.
Step 08. I did a color balance, which isn't necessary.
The key to getting good at self portraits, just like anything else, is studying the head and doing as many self portraits as you can. Do one in grayscale, try one in color, do one in pen and ink, do one using only your finger to paint so that you only focus on big shapes. Most importantly, have fun and stay persistent.
Hope this helped someone!
Image size
1800x1456px 892.87 KB
© 2014 - 2024 jeremygordonart
Comments0
Join the community to add your comment. Already a deviant? Log In